How to Sell Online Without SSN? No SSN, No Problem!
As a minor or a temporary resident, it could be difficult to sell online without a Social Security N ...
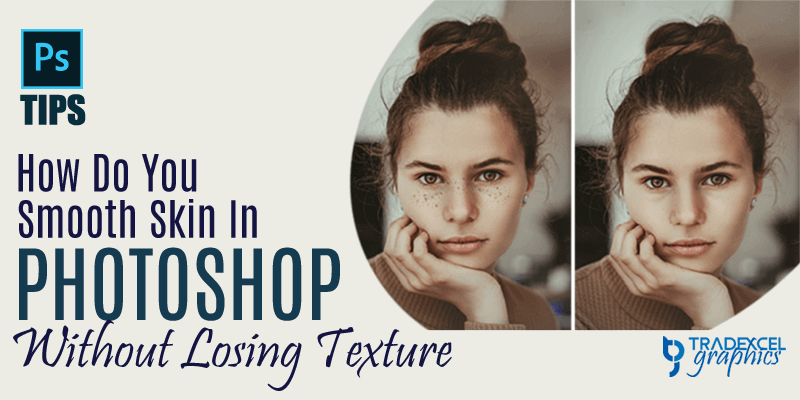
Model Images like headshots, portraits shots, fashion photos, and all the photos with models in it require image retouching to enhance and maximize the beauty of the models skin and the images. Sometimes we tend to stretch our skin smoothening process so much that we lose the actual texture of it. In this article, I will be showing you how do you smooth skin in photoshop without losing texture.
Before starting this photoshop tutorial we have to keep in mind that we will be removing temporary problems like acne or other minor skin issues. We will not erase permanent qualities and features or perhaps some wounds because they are precisely what makes someone that they are.
We will be starting by the glamour retouching which will allow us to learn, how to remove skin blemishes, spots, acne scars in photoshop by using Photoshop’s Spot Healing Brush and then after the basic clean up we will dive into a step by step photoshop tutorial on how to smooth and soften the skin without loosing the natural texture. So without any delay let’s get started our first initial clean up mission, right?
Before starting please take a close look at the below images where you can see the before/after of the image we are going to use in this tutorial.
Before/After Image
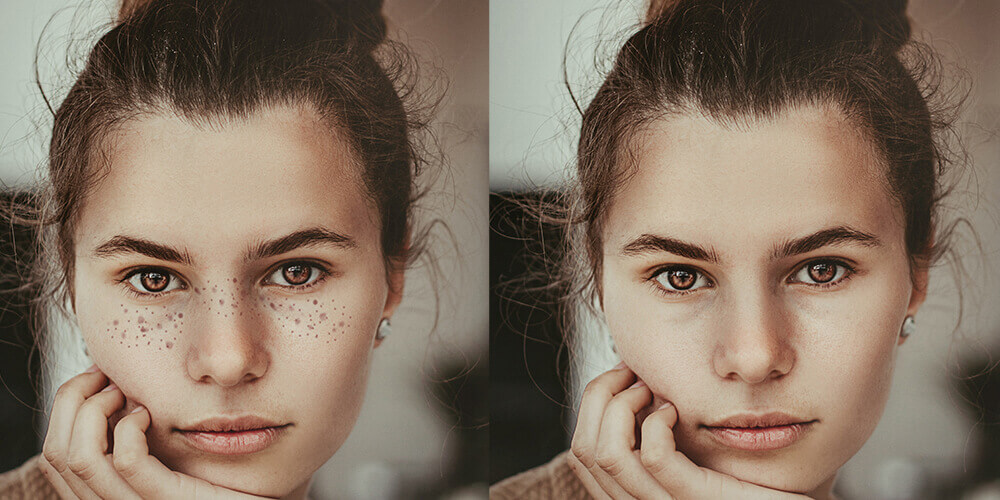
If you closely look at the before image you will notice the imperfections in the skin of the model. There are multiple acne spots, blemishes and many other minor skin problems that are definitely visible and obviously ruining the beauty that the model possesses
Now that we are ready to launch, I want to mention another important topic that is, “which photoshop software is best for beauty retouching?” The answer is Adobe Photoshop CC. Always try to use the latest version of adobe photoshop cc to get the best result.
Step 1: First thing first, we need to insert our image in photoshop and make a duplicate layer of it. Why do we need to make a duplicate layer? Because if you do not create a duplicate layer whatever edit we do it would be done on the original image file and if something goes wrong our original image will be affected.
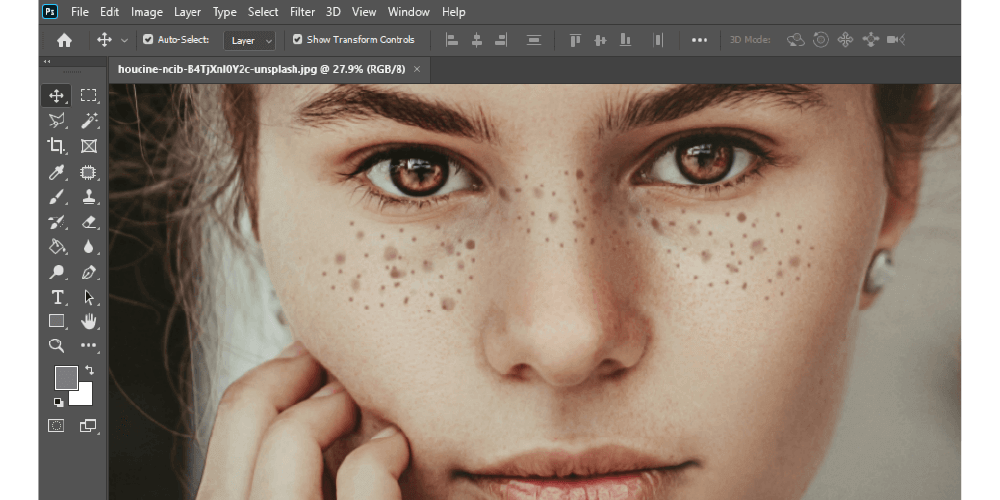
Now, how to duplicate layer in photoshop? Well, to make a duplicate layer of the original file we need to press the Alt key and drag down the original layer onto the New Layer icon at the bottom of the Layers panel. See the below image for more clear understanding.
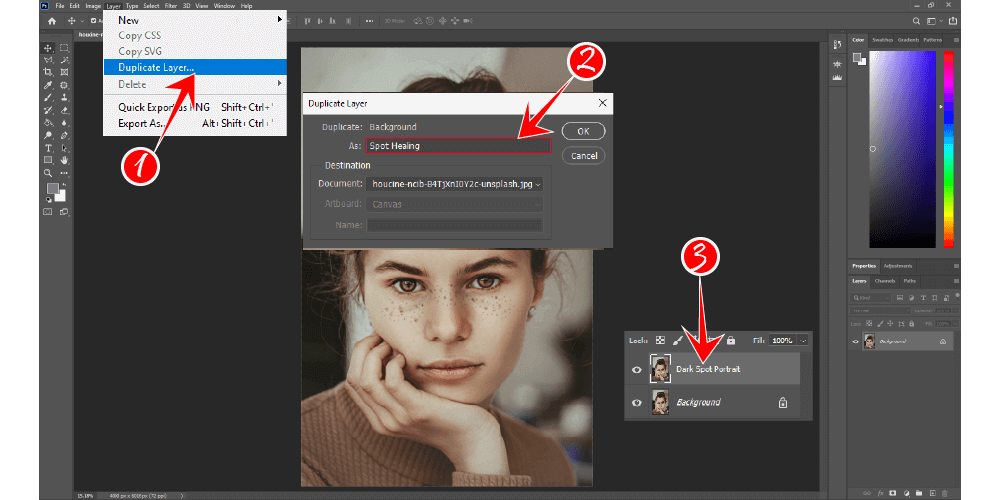
In the duplicate layer creating process set the new layers name to Spot Healing and then click OK to proceed. The spot healing layer will be created on top of our original layer.
Step 2: It’s time to work on the new layer and as the name suggested we will do some clean up in this step. To do the spot healing process we will use the Photoshop Spot Healing Brush. We will find the spot healing brush in the toolbar section and we will select the brush as shown in the below image.
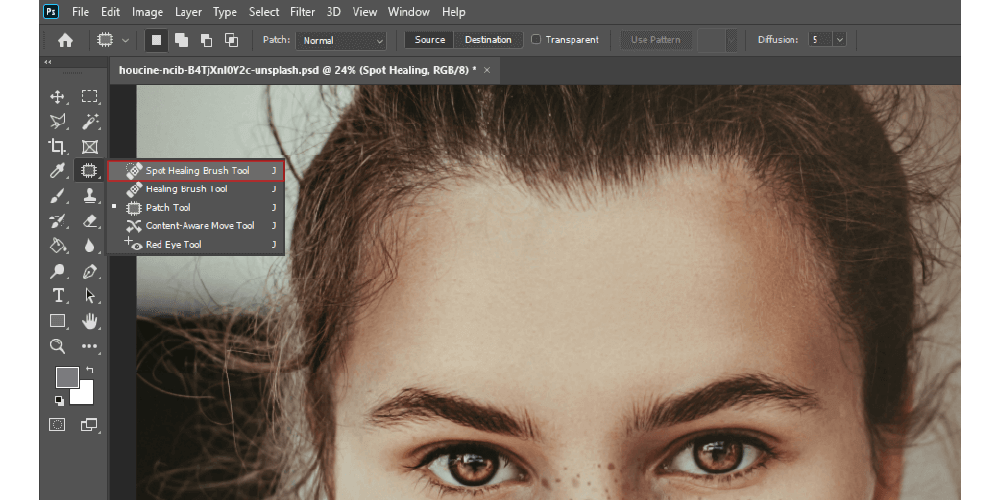
After selecting the spot healing brush we will set the Type option of the brush to Content Aware. Now before going to the next step let’s talk a little bit about the content aware option. What is photoshop content aware fill? What are the advantages of photoshop content aware fill?
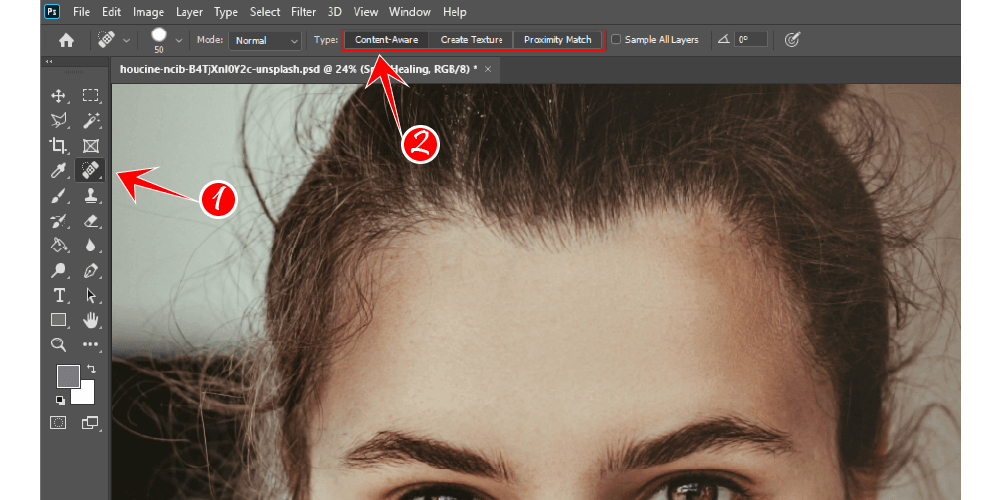
Content aware fill is one of the latest features of adobe photoshop cc 2020. It has AI integrated in it that helps to fill the images with missing background or surface by analysing the surrounding surface. So we don’t need to think about where we will bring the texture after removing a flawed one content aware feature will do it automatically. So as we are going to remove spots from the skin this feature will fill the spot with a suitable texture from the surrounding area.
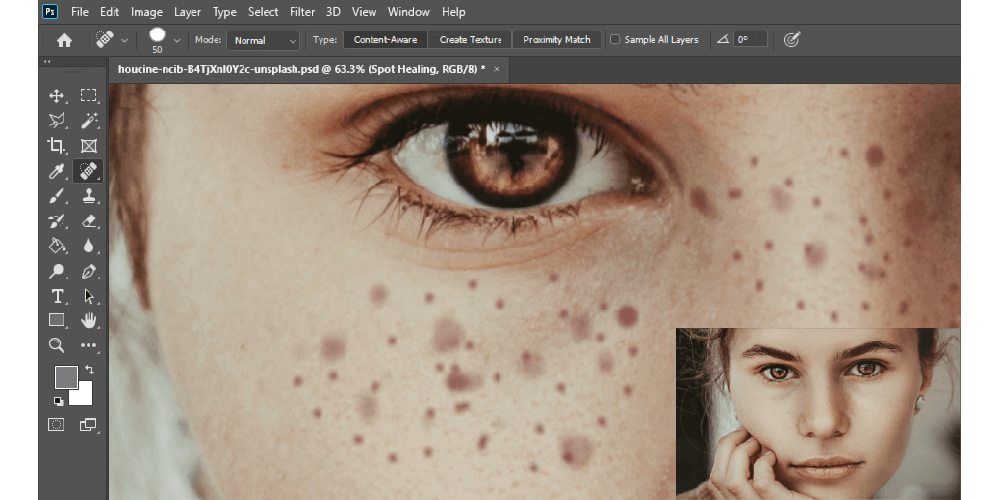
Step 3: After selecting the spot healing brush and changing the type option to content aware we will place the brush on a spot (As shown on the image below) and click. The content aware will analyze the problematic area and remove the spot by filling it with the same texture but fresh by bringing from the surrounding area.
Pro Tip: To get the best result in removing the blemishes of the skin in photoshop you can set the brush size just a little bit larger than the spot.
How to change brush size in photoshop? Press the Right Bracket Key (]) to make the brush large and Left Bracket Key ([) to make it smaller. If you are unable to remove the blemish or the spot at the first try then the brush size you have selected is large or small what you require. So undo the process, set the brush size correctly and try again.
Step 4: Now apply this process and clean up the whole face of the model. After applying initial clean up all over the skin you will get a much improved and fresh looking skin already.
Step 5: Now that we have fixed the spots and blemishes from the photo, it’s time to smooth the skin. To do that we have to start with creating another new layer like we did earlier. Earlier we have created the new layer from the original file and now we will create the new layer from our Spot Healing Layer.
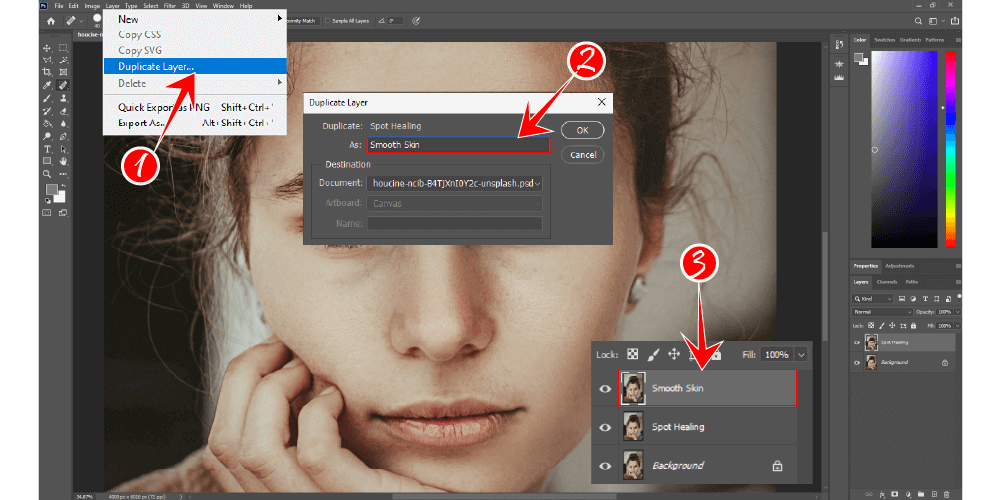
Why is that? Because we will be applying the skin smoothing top of the spot healing layer to complete our editing. We will set the name for this new layer as Smooth Skin.
Step 6: After creating the layer now we will select the High Pass Filter. To do that first go to the Filer menu then select Other and then High Pass.
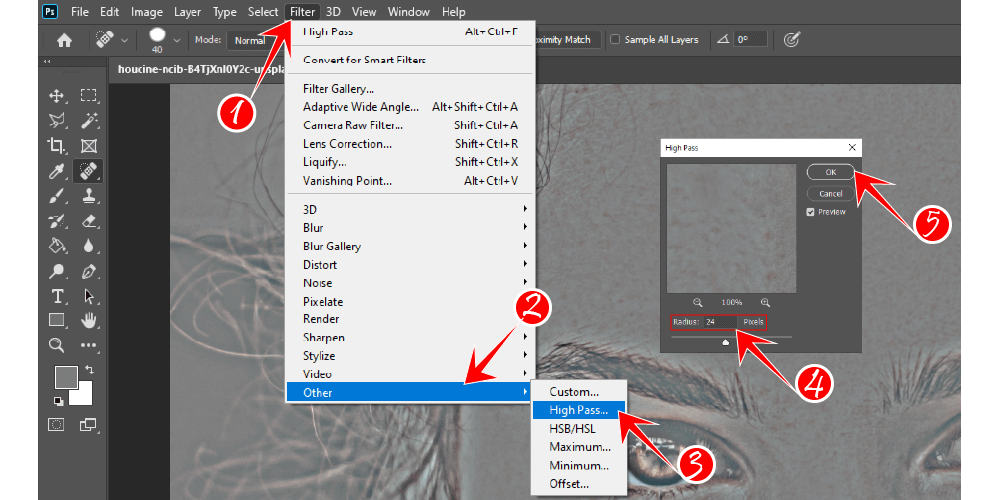
After selecting the high pass we have to select a suitable Radius to get the best result. The high pass filter high the edges and the Radius defines the “thickness” of the highlighted edge.
For this tutorial we will set the Radius value slightly high. Feel free to play with the setting and find the sweet spot for your image. A radius of 24 pixels works well for a typical portrait shot. When you are done finding the Radius value for your image click OK.
As you are seeing that the color of the image has turned into a gray where solid gray areas resemble the skin and the non-edge areas of the skin, whereas large, contrasting halos highlight the edges.
Step 7: Now it’s time to add Gaussian Blur to blur the high pass filter effect. This is to bring more good texture in the image. To select the Gaussian Blur choose Filter→ Blur→ Gaussian Blur.
Remember to set the Radius value for the Gaussian Blur is One Third to the Radius value of High Pass.
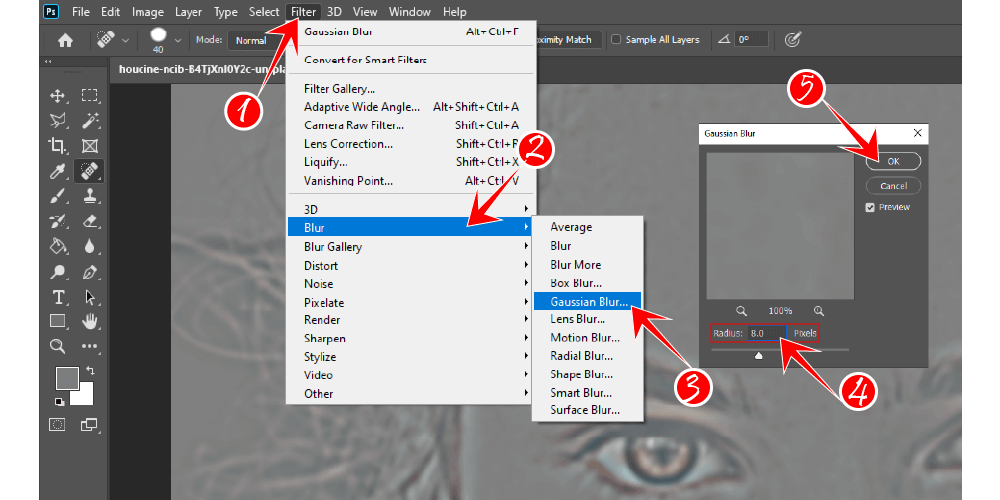
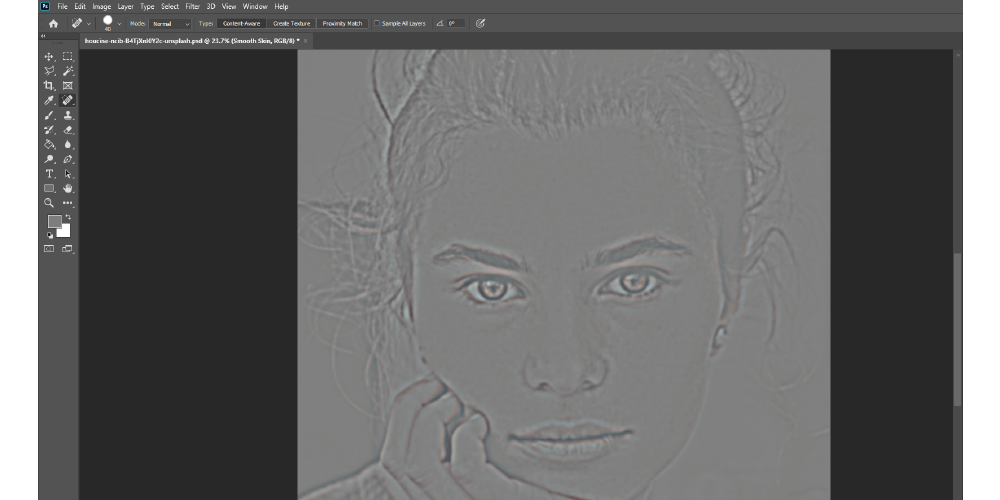
Step 8: After blurring the image the detailed result that we got after applying the high pass we will now get a blurred photo like the below one.
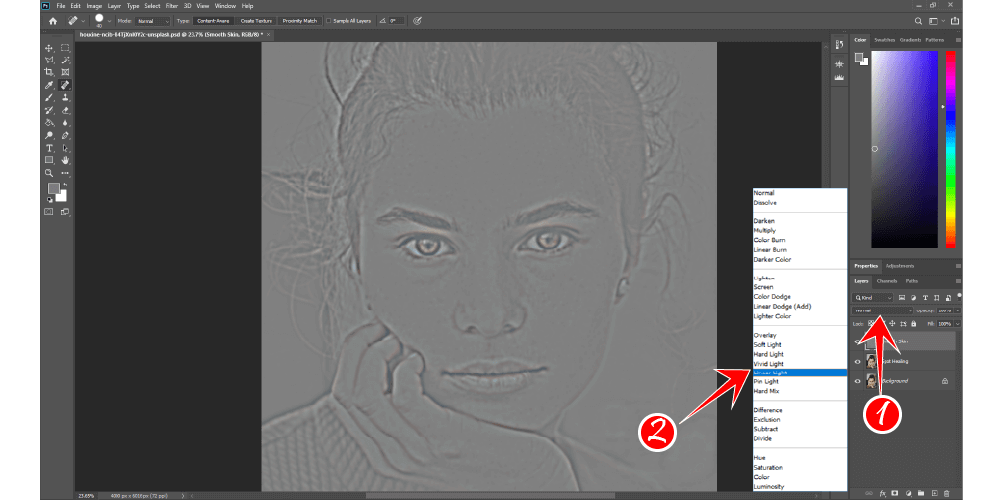
Step 9: Now from the layer panel we need to change the blend mode. Set the blend mode to Linear Light. By default it is set to Normal.
Step 10: After changing the blend mode we have to invert the layer. To do that we need to choose Image→ Adjustments→ Invert.
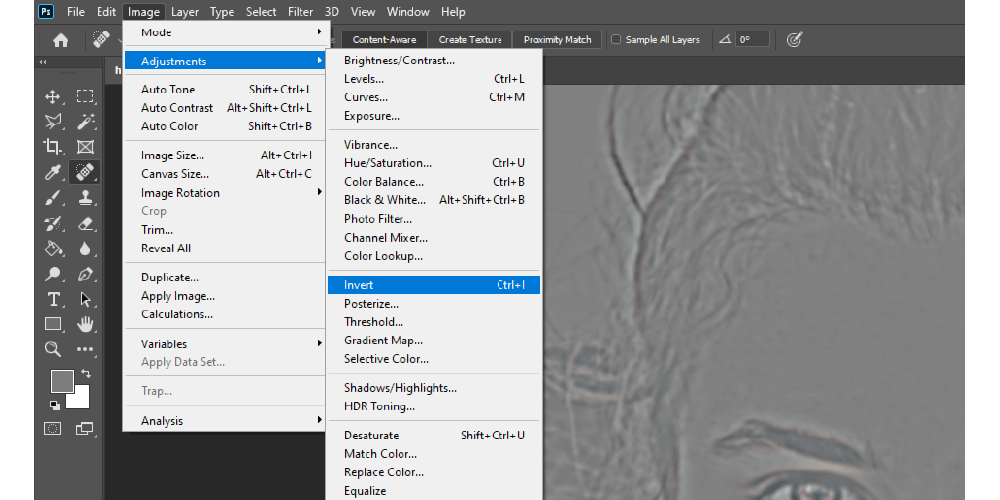
The inverted layer makes the picture look like a weird, bubble-like mess with big hideous halos.
Step 11: The next step is to reduce the halo effect and to do that we need to select the Layer Styles icon at the bottom of the Layers panel. Now choose the Blending effect.
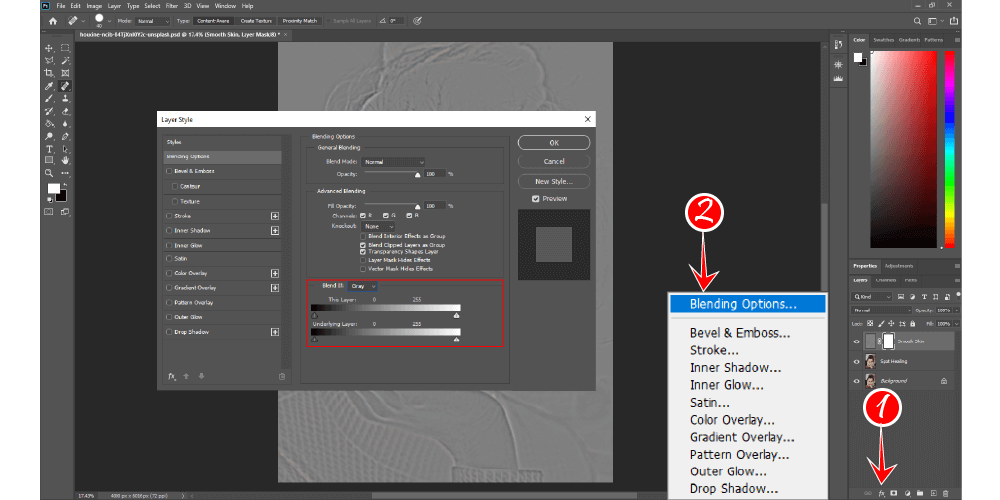
Step 12: From the Layer Style dialog box select the Blend if option with sliders.
Now let’s talk a little bit about the blend if option. What is Blend if option in photoshop? What does the slider of the blend if option do? Blend if option helps to blend the darker and the lighter areas.
If you see the sliders you will notice that they have dark and light parts with an indicator for each of the sides. There are two sets of sliders one is called “This Layer” and one below it called “Underlying Layer”. For today’s tutorial we will only use the first slider that is known as “This Layer”.
Step 13: I hope we got a basic understanding of the blend if option now it’s time to do the editing. With the slider of the blend if option we will reduce the halo effect. To do that firstly we will work with the lighter portion of the slider.
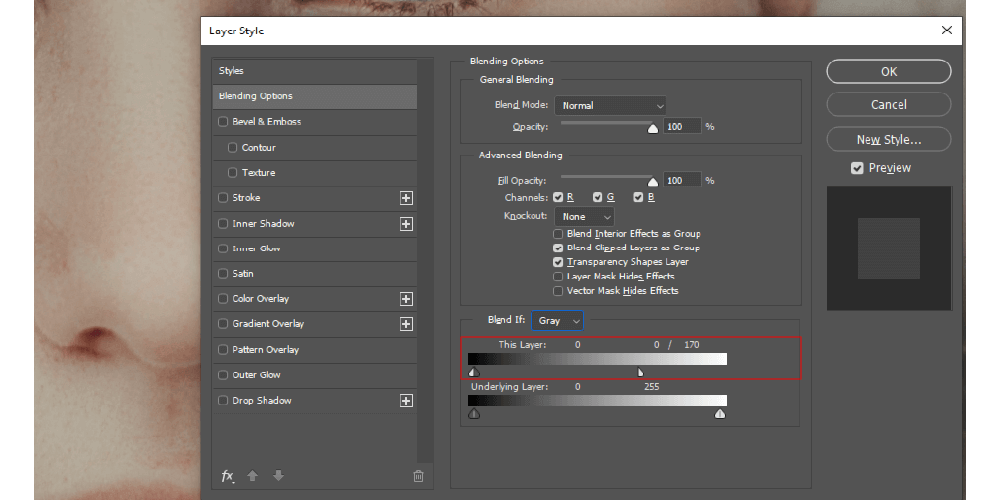
We will reduce the lighter halor by sliding the indicator of the lighter side that is on the right side. We will slide the indicator from right to left and we will see the changes immediately. To slide the indicator just press Alt and grab the indicator and slide the cursor to the left.
When you press the Alt button, Photoshop will break the slider in half, only the left-hand side of the slider will travel while the right-hand side stays in place.
Pro Tip: To get the best result, bring the right half slider all the way to the left.
Step 14: Now we will reduce the dark halos effect. Just like we work with the slider of the lighter part to reduce the light halos, we will repeat the same process but this time with the slider of the dark part.
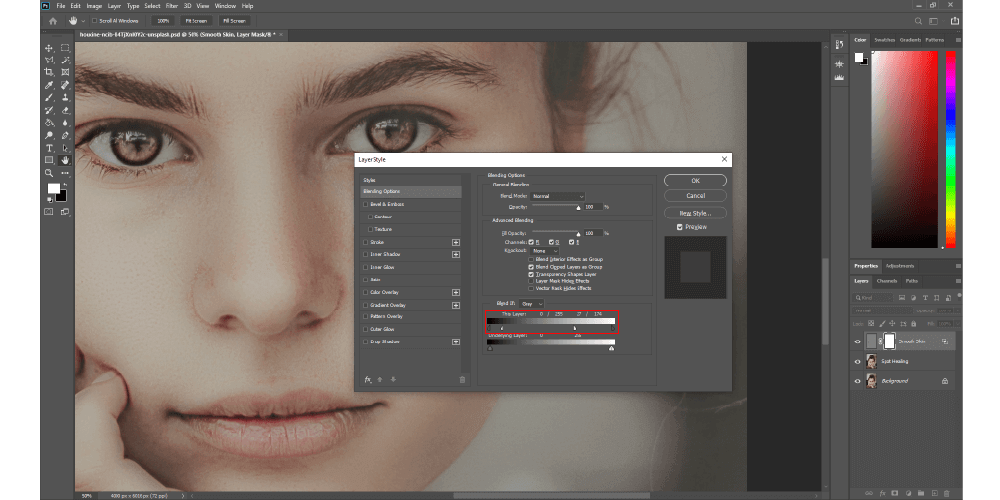
Hold the Alt, drag the indicator of the dark side all the way to the right and the dark halos will be reduced from the image.
Step 15: After reducing the halo effect we need to start smoothing the skin but first we have to limit the smoothing to avoid overdoing it. To do that we will add a Layer Mask to the smooth skin layer.
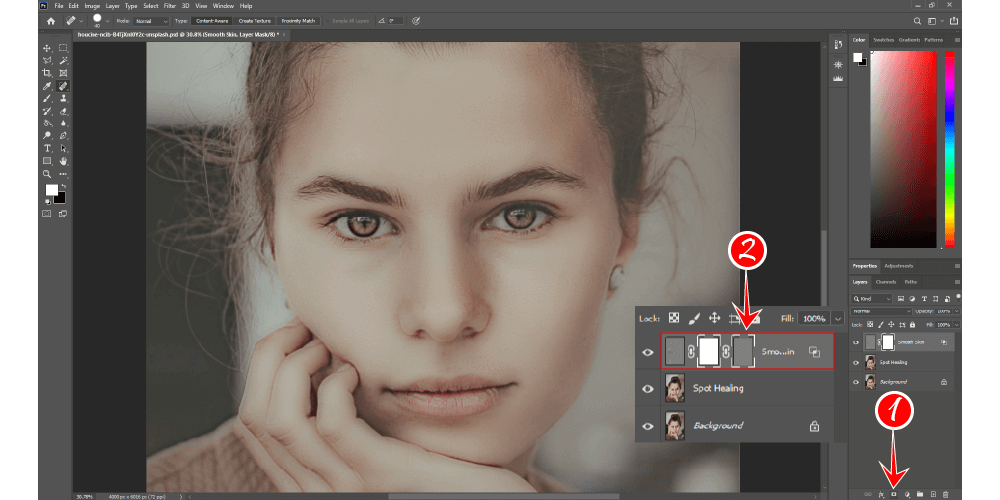
To do that we have to go to the Layers panel, hold the Alt key and click the Add Layer Mask icon.
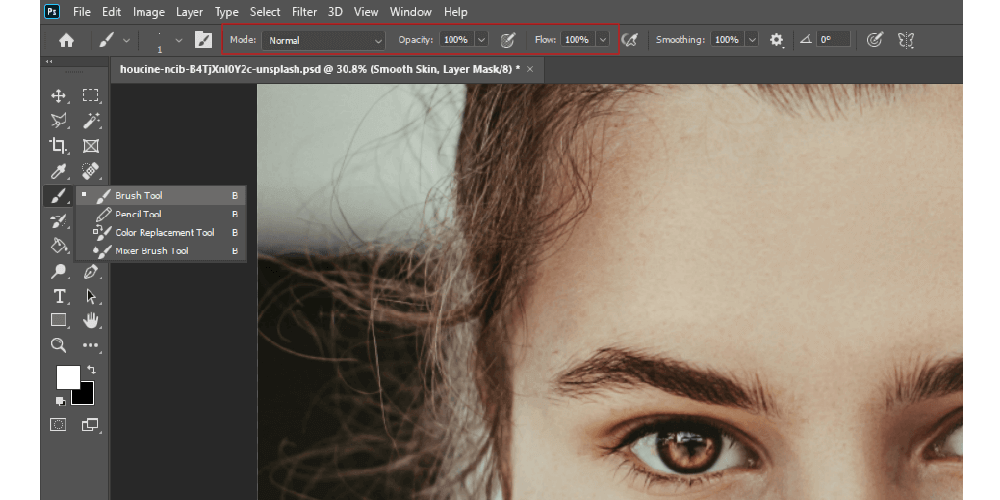
Step 16: It’s time to select the Brush Tool and brush over the skin to get the final result. Select the brush tool from the Toolbar and set the foreground color to White.
Step 17: It’s time to use the brush and paint over the skin. Set the Mode to Normal, Opacity to 100%, Flow also at 100% and start painting over the skin to reveal the smoothing effect. Paint all over the area that you want to do the smoothing.
Step 18: This is the last step of our tutorial and in this step we will lower the Opacity of the Smooth Skin. The sweet spot of the opacity is 40 to 60% but it totally depends on the requirement of your image.
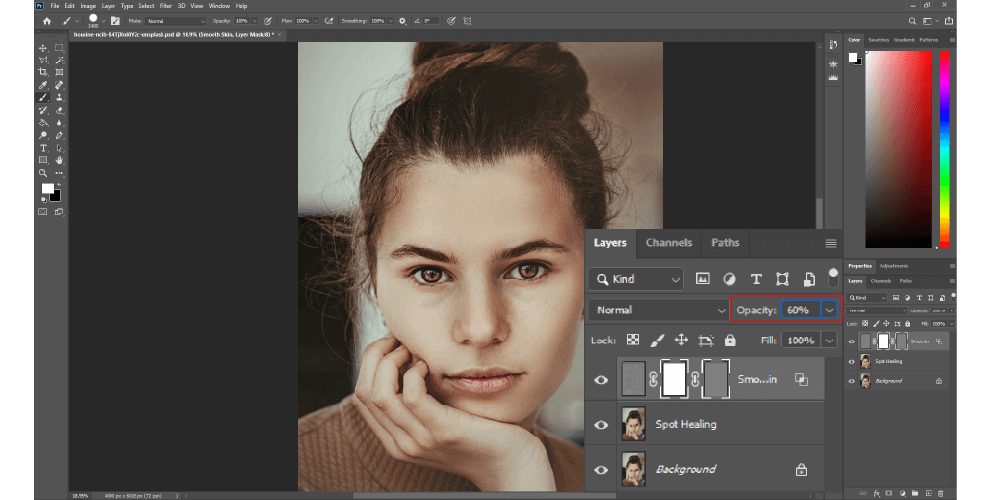
After editing the opacity our image is ready and lowering the opacity will make the skin look very smooth and soft as we wanted.
Here is the full step by step tutorial for you, See our in depth video tutorial for smooth skin in Photoshop below

Rashed Al Mamoon, COO of Tradexcel Graphics Ltd. (TGL) has given a truly inspirational contribution to the company since he joined. As Chief Operating Officer, he has used his innovative vision and excellent insight into restructuring the workflow of the organization, which minimized redundancies and improved productivity.
It incorporates not only a new management framework for the organization but also technologies that facilitate better Human Resource Management and Customer Services. He took over several projects simultaneously and ensured that results were delivered to the customer in accordance with the contractual time-frame. His success at improving project completion rates encouraged company profit.